Sony Dsch400 Power on and Off Again Error
Sony DSC-HX400V settings, tips and tricks
Introduction
This is an advanced manual for the SONY HX400V with tips and tricks. I'll be going through the entire menu arrangement with you and explicate you exactly what is what, giving you tips on how to setup your photographic camera along the fashion. The Sony H400V has trivial in common with the older HX300, and then you'll see lots of differences in the menu if you come from that photographic camera. Although the basic features did not change (a 1 2/3 BSI CMOS sensor with 20 meg pixels and a 50x zoom ranging from 24-1200 mm), several defects accept been corrected like a more powerful new Bionz X processor, slightly redesigned optical formula, Wi-Fi and NFC, a new user interface like the Sony RX100 and an accessory hot shoe.
This new bill of fare system might look disruptive at first, simply you'll quickly go the hang of information technology if you spend some time reading this Sony HX400V guide. The Sony manual does offer insights on this, but to exist honest, it does not give you lot a page by page explanation as I exercise. So sit back, read carefully and go ready to learn. If there is a feature that you don't want to tweak or acquire, just skip it and move to the next chapter.
Diving into the Card system
When yous switch on your camera, you lot'll be asked to enter a date, time and timezone. This setting is necessary, as all images captured volition have a timestamp, making it like shooting fish in a barrel to find your favorite pictures in the future.
Later this is setup, press the MENU button. You'll run into a range of icons and pages.
We'll start at page i of the camera Icon (camera settings)
(Carte → Camera Settings → page one)
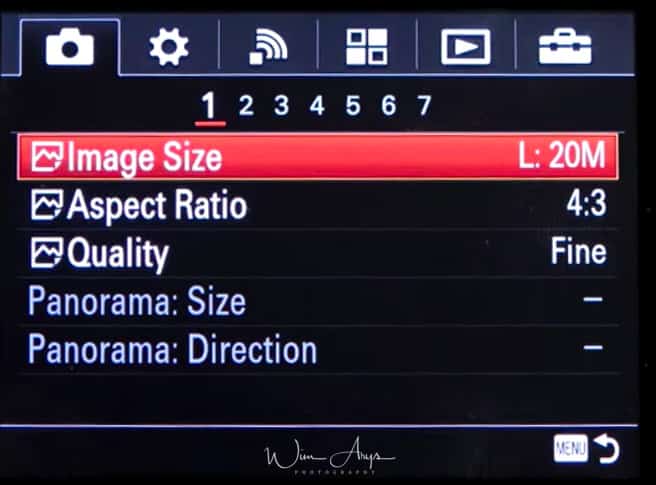
Prototype size:
The larger the paradigm size, the more detail volition be reproduced when the image is saved. The smaller the image size, the more images can be recorded. Much depend upon the intended use for your images, but if you can spare the extra expense of a larger SD card, I would recommend you to set the image size to large.
Knowing the size in pixels at different attribute ratios and quality levels tin can tell y'all how big you can print. An A3 print is 3508 pixels x 4961 pixels, then you lot can comfortably print your images on an A3 paper if you set up the Image size to Large. Setting image size to medium would correspond to your prototype filling on a full-screen 4Kmonitor.
The of your epitome in pixels when Aspect Ratio is iii:2:
- L: 18M 5184×3456 pixels
- M: 8.9M 3648×2432 pixels
- S:: four.5M 2592×1728 pixels
The size of your image in pixels when Attribute Ratio is 4:3: (RECOMMENDED):
- Fifty: 20M 5184×3888 pixels
- Grand: 10M 3648×2736 pixels
- Due south: 5.0M 2592×1944 pixels
- VGA 640×480 pixels
The size of your image in pixels when Aspect Ratio is 16:9:
- L: 115M 5184×2920 pixels
- M: vii.5M 3648×2056 pixels
- Southward: 2.1M 1920×1080 pixels
The size of your image in pixels when Aspect Ratio is 1:one:
- L: 15M 3888×3888 pixels
- M: vii.5M 2736×2736 pixels
- S: 3.7M 1920×1920 pixels
Aspect Ratio
You tin cull four:3 (which uses the full sensor surface), iii:ii, 1:1 or 16:9 (ingather simply a more wide view). Unless y'all are not interested in editing your images later on, leave as is at 4:three, you lot tin can always crop in a photo editor. Remember that if you decide to utilise a unlike attribute ratio, what is cropped out will not exist saved.
Quality:
The HX400V is not capable of storing RAW images. RAW basically ways that all the information captured by the camera's sensor is saved unprocessed.
Instead, this camera saves it as a JPEG file. This Jpeg will accept gone through all your settings similar added sharpness, racket reduction, white residue, etc as well as being compressed to a certain degree.
Yous have 2 compression options available: FINE (larger) and STANDARD (smaller, less quality) which takes up less infinite on your SD carte merely is less suited for editing after.
I always recommend setting Quality to Fine. When y'all're investing in a good camera like this, yous don't desire to miss out on the fantastic detail in can produce.
Panorama size
(Just bachelor when in panorama shooting manner on the style dial) Size is selectable between standard and wide. Wide means your picture will encompass a larger area. Set it to standard, having to scan an even broader area when making panoramas will take some feel with the photographic camera to do efficiently.
Size is selectable between standard and broad. Wide means your picture will cover a larger area. Set it to standard, having to browse an even broader expanse when making panoramas volition accept some experience with the camera to do efficiently.
Set it to standard, having to scan an even broader area when making panoramas will take some experience with the camera to do efficiently.
Panorama direction
A panorama picture show is a composite of several images stitched together. When in this mode, yous'll see an arrow that guides you in what management and speed you should pan the camera to take the sequential images that will exist stitched together. You can cull the path in this menu (either, up, down, left or correct).
You lot tin make panoramas while scanning your camera up-down or left-correct.So what is this all near? This might sound disruptive at first, merely this comes down to how you concur the Sony DSC-HX400V when shooting panoramas: either in portrait or landscape orientation.

(Carte → Photographic camera Settings → folio 2)
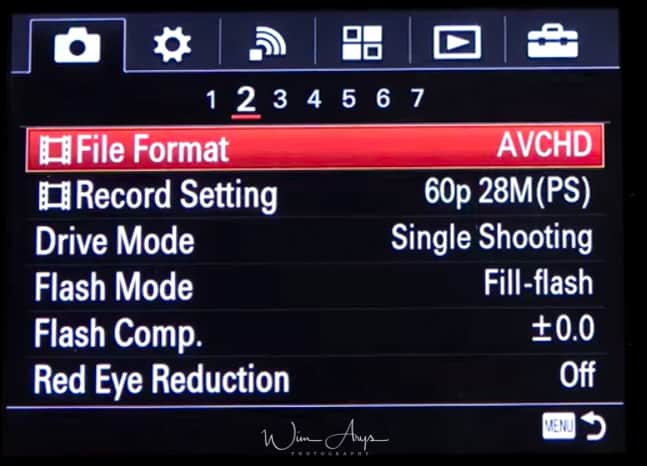
File format (for movies)
Selects the moving picture file format.
- AVCHD: Records Hd movies in AVCHD format. This file format is suitable for loftier-definition TV. Audio: Dolby Digital
- MP4: Records mp4 (AVC) movies. This format is suitable for playback on smartphones or tablets, web uploads, email attachments, etc. Audio: AAC.
Tape setting (as well a motion picture setting)
You tin can choose the quality of recorded video here. You tin alter the image size, frame rate, and paradigm quality for moving picture recording. The higher the bitrate, the college the image quality. If you're not familiar with this, go out as is.
When File Format is set to AVCHD:
- 60i/50i: Movies are recorded at approximately threescore fields/sec (for 1080 60i-uniform devices) or fifty fields/sec (for 1080 50i-compatible devices), in interlaced manner, with Dolby Digital sound, in AVCHD format.
- 24p/25p: Movies are recorded at approximately 24 frames/sec (for 1080 60i-compatible devices) or 25 frames/sec (for 1080 50i-compatible devices), in progressive style, with Dolby Digital sound, in AVCHD format.
- 60p/50p: Movies are recorded at approximately 60 frames/sec (for 1080 60i-compatible devices) or 50 frames/sec (for 1080 50i-compatible devices), in progressive fashion, with Dolby Digital audio, in AVCHD format.
When File Format is gear up to MP4:
- Movies shot are recorded in MPEG-4 format, at approximately 60 frames/sec (for 1080 60icompatible devices), approximately 50 frames/sec (for 1080 50i-compatible devices), approximately thirty frames/sec (for 1080 60i-compatible devices) or approximately 25 frames/sec (for 1080 50i-compatible devices), in progressive mode, with AAC sound, MP4 format.
Carte du jour items details: Settings as well depend on your isterion setting PAL/NTSC
When File Format is fix to AVCHD:
- 60i/50i 24M(FX): 50i 24M(FX: Records high image quality movies of 1920 × 1080 (60i/50i). Chip-rate: Approx. 24 Mbps (Max.)
- 60i/50i 17M(FH) (default setting)*: 50i 17M(FH) (default setting): Records standard image quality movies of 1920 × 1080 (60i/50i). Bit-rate: Approx. 17 Mbps (Avg.)
- 60p/50p 28M(PS): Records the highest image quality movies of 1920 × 1080 (60p/50p). Bit-charge per unit: Approx. 28 Mbps (Max.)
- 50p 28M(PS): Records the highest image quality movies of 1920 × 1080 (60p/50p). Flake-rate: Approx. 28 Mbps (Max.)
- 24p/25p 24M(FX): 25p 24M(FX)**: Records high epitome quality movies of 1920 × 1080 (24p/25p). This produces a picture palace-like atmosphere. Bit-rate: Approx. 24 Mbps (Max.)
- 24p/25p 17M(FH): 25p 17M(FH)**: Records standard image quality movies of 1920 × 1080 (24p/25p). This produces a movie theatre-like temper. Bit-rate: Approx. 17 Mbps (Avg.)
When File Format is set to MP4:
- 1440×1080 12M (default setting): Records movies of 1440 × 1080. Scrap-rate: Approx. 12 Mbps (Avg.)
- VGA 3M: Records movies of VGA size. Bit-rate: Boilerplate 3 Mbps.
General notes:
- 60p/50p movies can exist played back only on compatible devices.
- Movies recorded with the [60p 28M(PS)]/[50p 28M(PS)]/[60i 24M(FX)]/[50i 24M(FX)]/ [24p 24M(FX)] /[25p 24M(FX)] setting in [ Record Setting] are converted by PlayMemories Home in order to create an AVCHD recording disc. This conversion can take a long time. Besides, you cannot create a disc in the original epitome quality. If you want to keep the original image quality, shop your movies on a Blu-ray Disc.
- To play back60p/50p/24p/25p movies on a TV, the Television receiver must be compatible with those formats. If the TV is not uniform with the 24p/25p format, 24p/25p movies will be output as 60i/50i movies.
Drive Mode
You lot can set the drive way, such as continuous or self-timer shooting.
- Single Shooting (default setting): Shoots i still image. Normal shooting mode.
- Cont. Shooting: Shoots images continuously while you press and concur downwardly the shutter button. Hi: takes about ten images per 2nd, Lo about three.
- Self-timer: Shoots an image afterwards 10 or 2 seconds. (selectable in sub menu) You can change the angle of the LCD screen and shoot images while monitoring the image on the screen.
- Self-Portrait: When the HX400V detects the number of faces you have selected, a beep volition audio and the shooting starts later 2 seconds.
- Self-timer(Cont): Shoots a specified number of images continuously later 10, 5 or seconds or 2 seconds (selectable in the sub menu).
- Cont. Bracket: Shoots images while holding the shutter button downward, each with different degrees of brightness. (3 images between .iii and iii EV divergence, selectable in the sub menu.) For processing as HDR on your PC.
- WB bracket: Shoots a full of 3 images, each with a dissimilar color tone co-ordinate to the selected settings for white balance, colour temperature, and the color filter. (3 images with either LO small-scale changes or Howdy large changes)
Wink Mode
Flash off;
obvious
Autoflash:
The wink works in dark environments or when shooting towards a brilliant light.
Fill-flash:
The flash works every time you trigger the shutter.
Slow sync:
Tells the photographic camera to employ a longer shutter speed forth with a flash, and thus is ameliorate for night shots. In manual and shutter priority modes, there is no departure in flash power. Merely when using aperture priority, program, or machine, choosing slow sync tells the camera to use a longer shutter speed than it would ordinarily selection.What the deadening sync wink mode actual does is kickoff fire the flash for the subject exposure, then allow for a longer shutter speed that will allow for more ambient light to be captured by the sensor.
Advanced Flash:
The flash automatically operates in dark locations or when there is backlighting. In dark locations, the upper limit value of the ISO sensitivity increases in order to maximize the wink range.
Rear Sync:
Capturing an paradigm involves two shutter deportment: one when the capture starts and on when it stops. Rear Sync tells the flash to fire right before the shutter closes. Moving objects volition bear witness a streak where they came from and a precipitous image where they were at the end of the exposure. This conveys a sense of speed with moving objects. Rear Sync is a artistic technique, if you'd like to know more about this type of photography, I'd suggest doing a Google search on 'Rear Sync Wink Photography.'
Wireless:
When using a wireless flash, the shading effect provides a more 3D appearance to a subject than when using an attached flash. This way is effective when you attach a remote control-compatible external flash sold separately to the camera, and shoot with a wireless wink, placed away from the production. If you're looking for a suitable flash, you'll need one that corresponds to the Sony MIS (multi-interface shoe). If you want to save some money, accept a look at brands like Godox or Neewer.
Flash compensation:
Adjusts the amount of flash lite in a range of –two.0 EV to +ii.0 EV. Wink compensation changes the amount of flash lite only. Exposure compensation changes the amount of flash lite along with the alter of the shutter speed and aperture.
Specially when using Slow Sync or Rear Sync Wink modes, you might have to lower the power of the Flash to get a decently exposed paradigm.
Red Eye Reduction:
This anti-Red Center setting quickly fires the wink before your image capture starts, reducing the red-eye effect often seen when using the flash.
(MENU → Camera Settings → page 3)

Focus area
You might think it is best to go out it on the manufactory 'wide' setting (equally this uses all AF points), but for certain scenes, it is oftentimes better to utilise a zone or flexible spot to get it to focus on what you want.
Wide:
Broad focus area uses all focus points on the sensor. Ideal for action scenes where at that place is a lot of movement going on in your frame.
Center:
Focusses on whatever is centered in your images. A fail-proof manner of getting the camera to focus on what yous desire. If you lot have whatever problems using the autofocus and are in a state of affairs where you don't desire to miss any shots, revert to Center and just make sure you lot accept your subject centered.
Flexible spot:
Flexible spot area selects a spot anywhere on the screen where the camera should focus. (similar to Center spot, except not.. in the heart) You tin can fix it to pocket-sized, medium or big. If you desire to use this focus area, set it to medium or large, as the camera will struggle to notice focus when set to small (except perhaps for close-upwards portraits where y'all'd want to focus on the iris of the eye)
Focus Lock:
Shoots images with the focus locked on the desired subject in auto focus mode.
- Prepare the zoom/focus switch to AF/ZOOM.
- Identify the field of study within the AF expanse and press the shutter button halfway down. The focus is locked.
- Go on pressing the shutter button halfway downward, and identify the subject area back in the original position to re-compose the shot.
- Printing the shutter button down fully to take the picture show.
AF Illuminator:
The AF illuminator is a little red light allowing the photographic camera to focus more hands when the shutter button is pressed halfway. It automatically is switched off when you fully printing the shutter. Leave it on.
Exposure Comp
If you find that your image is overexposed (for instance when you are shooting at large apertures for a shallow depth-of-field in bright daylight), y'all can tweak the exposure compensation here in a plus or minus 2 (exact EV dependent on next footstep) range.
ISO
You can select at which ISO value you'd like to capture your image or change the AutoISO range
I have this range prepare betwixt fourscore-800 every bit this range is nearly noise free, and I don't like the ISO performance above 1600. When shooting in depression lite, you might think of using a higher top value (factory setting goes up to 3200).
Tip: Autofocus will also work better at higher ISO.
Metering Manner
Metering mode refers to the way the camera reads the lite and sets the exposure.
In multi, it considers the whole frame and sets exposure according to internal algorithms programmed in photographic camera.
In spot or middle, the camera just considers what is in that spot or the center (per instance, if your subject is completely blackness, the camera will effort to compensate by overexposing the prototype).
If you like dark or moody portraits, try setting Metering Mode to Spot or Middle, and brand sure your subjects confront is centrally positioned in the frame. You'll see that the exposure will be more suitable for the face than when set to Multi.
(Card → Photographic camera Settings → folio 4)
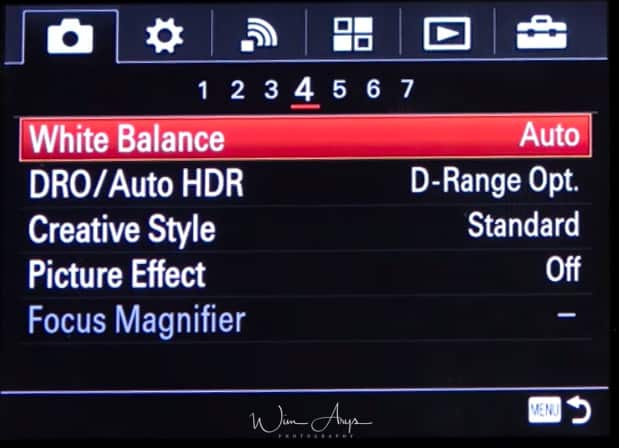
White Residual
You tin either:
- Auto (default setting): The product automatically detects the light source and adjusts the colour tones.
- Daylight: The color tones are adjusted for the daylight. Shade: The color tones are adjusted for shadiness.
- Cloudy: The colour temperature is adapted for a cloudy sky. Incandescent: The color temperature is adjusted for places under an incandescent lamp, or under bright lightings, such as in a photo studio.
- Incandescent: The color temperature is adjusted for places nether an incandescent lamp, or under bright lights, such as in a photograph studio.
- Fluor.: Cool White: The color temperature is adjusted for white fluorescent lighting.
- Fluor.: Twenty-four hours White: The color temperature is adjusted for neutral white fluorescent lighting.
- Fluor.: Daylight: The color temperature is adjusted for daylight fluorescent lighting.
- Flash: The color temperature is adapted for a wink.
- C.Temp./Filter: Adjusts the color tones depending on the light source. Achieves the effect of CC (Color Bounty) filters for photography.
- Custom: Uses the white balance setting saved in [Custom Setup].
- Custom Setup: Memorizes the basic white color under the light conditions for the shooting surroundings.
DRO/Auto HDR
DRO:
This stands for Dynamic range optimize and analyses the contrast of your scene in real-fourth dimension. It produces an epitome with optimal effulgence and recovered shadow item. You tin can use this role fifty-fifty while the subject is moving or during the continuous shooting.
- D-Range Optimizer: Auto (default setting): Corrects the brightness automatically.
- D-Range Optimizer: Lv1 ― D-Range Optimizer: Lv5: Optimizes the gradation of a recorded image for each divided area. Select the optimization level from Lv1 (weak) to Lv5 (strong)
Auto HDR:
This characteristic Shoots three images with different exposures and so overlays the bright area of the underexposed image and the dark surface area of the over exposed paradigm to create a film with an extended range from highlight to shadow.
The highlight detail in auto HDR is better than that in DRO and with reduced noise. The shutter is released three times, so using this function for moving subjects is not recommended.
- Motorcar HDR: Exposure Diff. Auto (default setting): Corrects the exposure difference automatically. Machine HDR: Exposure Diff. one.0EV ―
- Car HDR: Exposure Unequal. 6.0EV: Sets the exposure deviation, based on the contrast of the subject field. Select the optimal level between i.0 EV (weak) and 6.0 EV (strong). For case, if you set the exposure value to 2.0 EV, three images volition exist composed of the following exposure levels; −ane.0 EV, optimal exposure, and +1.0 EV
Creative Manner
This card setting allows yous to select the desired image processing. You can adjust exposure (shutter speed and aperture) every bit you similar with [Creative Fashion], dissimilar with [Scene Choice] where the product adjusts the exposure.
- Standard (default setting): For shooting diverse scenes with rich gradation and beautiful colors.
- Vivid: The saturation and dissimilarity are heightened for shooting striking images of colorful scenes and subjects such every bit flowers, jump greenery, blue sky, or ocean views.
- Portrait: For shooting the skin colour in a soft tone, ideally suited for shooting portraits.
- Landscape: The saturation, contrast, and sharpness are heightened for shooting vivid and crisp scenery. Distant landscapes also stand up out more.
- Sunset: For shooting the cute red of the setting sun.
- Blackness & White: For shooting images in black and white monotone.
- Sepia: For shooting images in sepia monotone.
Dissimilarity, Saturation, and Sharpness tin can exist adjusted for each Artistic Style item. Select an detail to be set up by pressing the right/left side of the control bike, and then prepare the value using the elevation/bottom side of the command wheel.
- Contrast: The higher the value selected, the more the difference of lite and shadow is accentuated, and the bigger the effect on the prototype.
- Saturation: The higher the value selected, the more vivid the colour. When a lower value is selected, the color of the epitome is restrained and subdued.
- Sharpness: Adjusts the sharpness. The higher the value selected, the more the contours are accentuated, and the lower the value selected, the more the contours are softened.
Picture Effect
Call up of this carte as an Instagram app correct in your camera, with all kinds of retro filters and furnishings. These are merely available when quality is fix to Jpeg (Not in RAW). You can perform detailed settings for some of the effects past using the left/right side of the control wheel.
- Off (default setting): Disables the Picture Effect function.
- Toy Camera: Creates a soft paradigm with shaded corners and reduced sharpness.
- Pop Color: Creates a vivid look by emphasizing color tones.
- Posterization: Creates a high contrast, abstract expect past heavily emphasizing primary colors, or in black and white.
- Retro Photograph: Creates the expect of an aged photo with sepia colour tones and faded contrast.
- Soft High-key: Creates an image with the indicated atmosphere: bright, transparent, ethereal, tender, soft.
- Partial Color: Creates an image which retains a specific color, but converts others to blackness and white.
- High Dissimilarity Mono.: Creates a high-contrast image in black and white.
- Soft Focus: Creates an image filled with a soft lighting upshot.
- HDR Painting: Creates the look of a painting, enhancing the colors and details.
- Rich-tone Mono.: Creates an image in black and white with rich gradation and reproduction of details.
- Miniature: Creates an image which enhances the subject vividly, with the background defocused considerably. This effect may often exist found in pictures of miniature models.
- Watercolor: Creates an image with ink bleed and blurring effects equally if painted using watercolors.
- Illustration: Creates an illustration-similar image by emphasizing the outlines.
Focus Magnifier
Some other quite handy feature if y'all desire to check if your image is in focus. It means that you can check the focus by enlarging the paradigm earlier shooting. Great for shooting in manual focus or DMF. You lot can too gear up how long the magnified image will be shown in the Focus Magnif. Time setting. (custom settings).
Press on the center of the control wheel to overstate the epitome and select the position you lot desire to enlarge using up/down/left/correct side of the command wheel. You can change the magnifier scaling in two steps by pressing in the eye, and close the focus magnifier mode and return to the normal shooting display by pressing 3 times
You can change the magnifier scaling in two steps by pressing in the center, and close the focus magnifier style and return to the normal shooting brandish past pressing three times.
(Menu → Camera Settings → page 5)
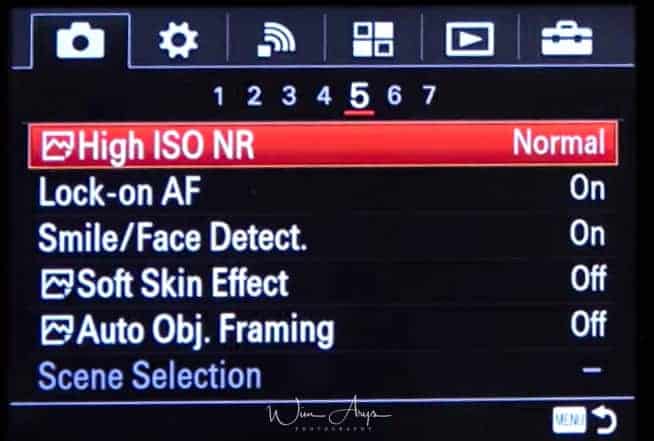
If y'all've stumbled on my guide trying to find where to turn on Long Exposure noise reduction, I'll have to disappoint you. Although 1 on the most requested features, the DSC-HQ90V does non have this functionality.
High ISO NR
Here you tin select the amount of noise reduction applied to images with high ISO settings (when quality is gear up to jpeg). As Sony has rather aggressive noise reduction, I would chance it to Low. (if not, you run the risk of getting paint-like, smeared images at higher ISO values)
Lock-on AF
This is a very powerful autofocus characteristic. When turned ON, it allows you to track a subject. In the iAuto mode, you can admission this feature (when turned ON and the camera is gear up to AF) past pressing the Centre button of the multi-controller. You'll run into a square on your screen, then center your desired tracking field of study and the camera will continue to track it, fifty-fifty when it exits your frame and reappears.
Grinning/Face Detect
This is some other powerful feature. It tin be set up to automatically detect on focus on faces and enable a function called Smile Shutter. When the latter is enabled, the camera volition automatically capture an image when a smile is detected. Did I hear you say Selfie? Yes, information technology'due south the ultimate selfie tool.

Soft skin effect
Sets the effect used for shooting the pare smoothly in the Face Detection function. I don't similar the results, so on my camera, it is turned off.
Auto Object Framing
When enabled, the Sony HX400V will automatically crop your captured image to what it deems best. Meaning information technology will cut the picture show for a nicer composition. A dainty feature if yous don't want to bother also much with the technical side of photography.
Scene Selection
Allows you lot to shoot with preset settings co-ordinate to the scene.
- Prepare the style dial to SCN (Scene Choice).
- MENU → (Camera Settings) → [Scene Selection SCN] → desired mode. When [Fashion Dial Guide] is set to [On], y'all can select the desired settings after you lot have changed the position of the manner dial.
These presets are available:
- Portrait: Blurs background and sharpens the subject field. Accentuates the peel tones softly.
- Adv.Sports Shooting: Allows yous to shoot subjects with fast movements, such as sports. While the shutter is pressed halfway, the movement of the subject is predicted and the focus will be adapted.
- Landscape: Shoots the entire range of a scenery in sharp focus with vivid colors.
- Night Scene: Shoots night scenes without losing the night temper.
- Hand-held Twilight: Shoots night scenes with less noise and blur without using a tripod. A outburst of shots are taken, and image processing is practical to reduce bailiwick mistiness, photographic camera milk shake, and racket.
- Night Portrait: Shoots night scene portraits using the flash.
- Anti Motion Blur: Allows you to shoot indoor shots without using the flash and reduces subject area mistiness. The product shoots burst images and combines them to create the paradigm, reducing subject blur and dissonance.
- Pet: Allows you to shoot images of your pet with the best settings.
- Gourmet: Allows yous to shoot food arrangements in succulent and bright colors.
- Beach: Allows you to shoot scenes on the beach in bright and vivid colors even under the sunlight.
- Snow: Allows you to shoot articulate images, preventing sunken colors in snowy scenes or other places where the whole screen appears white.
- Fireworks: Allows you to shoot images of fireworks in all their splendor.
- Soft Skin: Allows you to shoot images of faces with a smoother look.
- High Sensitivity: Allows yous to shoot yet images fifty-fifty in dark locations without using the flash, and reduces subject blur. Too allows yous to shoot nighttime movie scenes more brightly.
(MENU → Camera Settings → page half dozen)
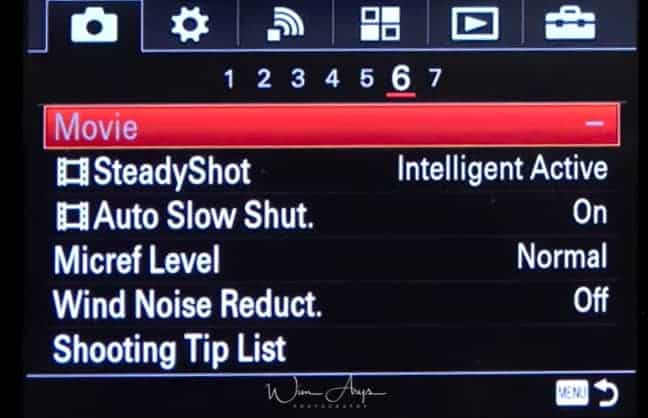
Movie
You can adjust the shutter speed or discontinuity value to your desired settings for recording movies. You can also check the image angle before shooting.
- Program Machine: Allows you to shoot with the exposure adjusted automatically (both the shutter speed and the aperture value).
- Aperture Priority: Allows you to shoot after adjusting the aperture value manually.
- Shutter Priority: Allows you to shoot after adjusting the shutter speed manually.
- Manual Exposure: Allows you to shoot after adjusting the exposure (both the shutter speed and the aperture value) manually
SteadyShot (for movies)
Sets SteadyShot when shooting movies.
Here yous accept 3 options:
- Intelligent Agile: Provides the nigh powerful SteadyShot issue. I gear up it to this.
- Active (default setting): Provides a more powerful SteadyShot effect.
- Standard: Reduces camera shake nether stable moving picture shooting condition.
Motorcar irksome close. (also a movie setting)
Sets whether or non to adjust the shutter speed automatically when recording movies if the subject field is night. Less light always means a longer shutter time in lodge to get a right exposure. Every bit when shooting stills, you might become some blur when you lot utilise this characteristic.
On: The shutter speed automatically slows when recording in dark locations. You can reduce noise in the picture show past using a slow shutter speed when recording in the dark.
Off: The recorded flick will be darker than when On is selected, just you tin can record movies with smoother motion and less object blur.
Micref Level
You can select the microphone level for moving-picture show recording to Normal (for dialogue) or Depression (for concerts etc).
Wind noise reduct.
Sets whether or non to reduce wind noise during motion picture recording.
Shooting tip listing
This setting basically turns the on-screen shooting tips on or off. If you're not fully comfortable with the camera, this is an excellent tool in order to get acquainted with all the functions and settings. One time it starts getting on your nerves, it means you know plenty to plow it off :).
(MENU → Camera Settings → page 7)
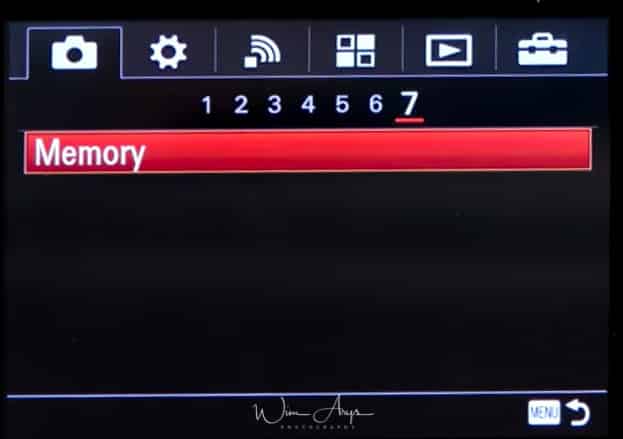
Retention
Allows y'all to register upward to 3 often-used modes or product settings in the product. You can recall the settings using simply the mode dial.
Items that can be registered:
- Shooting style
- Discontinuity (F number)
- Shutter speed
- Camera Settings
- Optical zoom scale
To recall registered settings: Set the mode dial to MR, then press the right/left side of the control bike or turn the control wheel to select the desired memory number.
To change registered settings: Change the setting to the desired i and re-annals the setting to the aforementioned mode number
(MENU → Custom settings (wheel) → page 1)
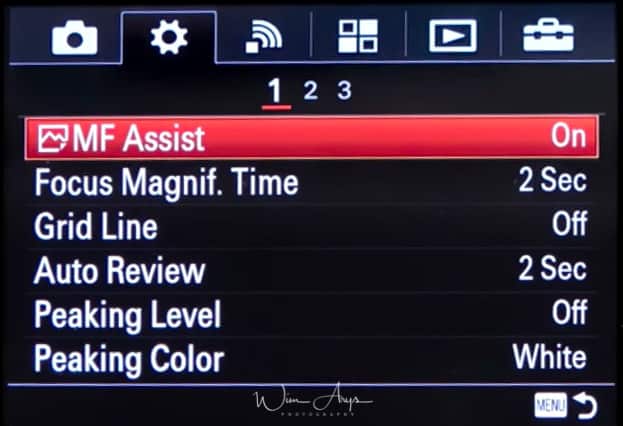
MF aid
This works in conjunction with the Focus Magnifier on Page 5 of the camera settings. You lot might recollect that you can select the surface area to magnify there when using transmission focus (MF). MF assist will need to be turned on if you want to use this feature.
Focus Magnif Time
Y'all tin set up how long to concur the magnified area during MF help. 2 sec, 5 seconds or no limit.
Ii seconds is how I accept information technology gear up upwards.
Grid Line
Having a grid line on your screen is a helpful aide for the composition of your image.
The homo brain is hard-wired to recognize the structure, and near people notice a well-composed image more centre-pleasing.
During photography history, rules have been developed on how to compose the different elements best within a scene. Many landscapes you'll come across have the horizon run through the middle of the image for example, only this is but limerick in its simplest grade. Many photographers with a thorough understanding of these techniques go far beyond that.
A proficient starting signal is using the in-camera filigree to make your brain aware of the possibilities in composition.
The Rules of 3rds, Foursquare and Diag +foursquare are available in the Sony HX400V.
Motorcar Review
Select the amount of time the camera displays your image directly after capturing the image. 10, 5 and ii sec is available, or you can plough this feature OFF if it annoys y'all.
Peaking Level
- Peaking Level is a manual focusing aid that works when y'all take your photographic camera gear up to MF or DMF.
- You'll meet a blazon of noise outlining the parts of your epitome where the focus lies; you can adapt the sensitivity to high, mid or low.
- Which setting is best depends on what lens y'all use, equally with a sharper lens it can be configured to low, while more soft lenses benefit from a medium or high setting to conspicuously visualize what yous're focusing on.
Peaking Color
You can choose the color of this Peaking between Red, white and yellow. I have it set to reddish, equally this contrasts nicely with most scenes y'all capture.
MENU – Custom Settings – page 2
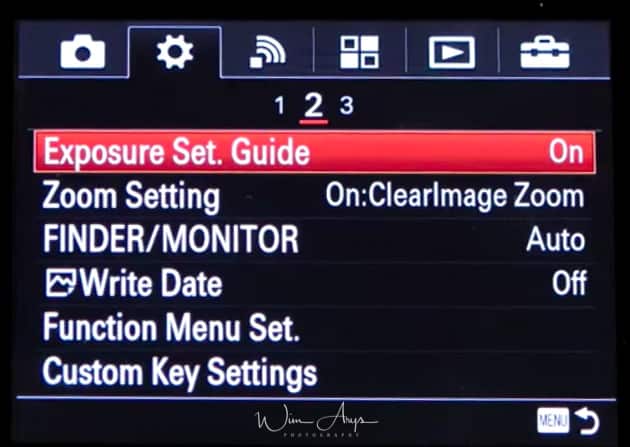
Exposure ready guide
Sets the guide displayed when exposure settings are changed in the shooting screen. Excellent tool when y'all're getting to know the functionality of your new camera. If yous're familiar with Sony's characteristic, turn it OFF.
Zoom setting
Set to Optical zoom merely, using the optical zoom capabilities of your lens. If you prepare this to digital zoom, the camera volition be basically cropping pixels out.
Finder/Monitor
Sets the method for switching the brandish between Electronic Viewfinder and the screen.
- Machine (default setting): When yous look into the Electronic Viewfinder, the brandish is switched to the Electronic Viewfinder automatically.
- Viewfinder: Switch between the Electronic Viewfinder brandish and the screen brandish by pushing upwardly/downwardly the popular-up finder. When the Electronic Viewfinder is pushed downwards, the image is displayed only on the screen. When the Electronic Viewfinder is pushed upwards, the screen is turned off and the image is displayed only in the Electronic Viewfinder.
Write Date
Sets whether to record a shooting engagement on the still image. Call up that you won't be able to delete the date postage on your image if it is turned On.
Function carte set up
You tin assign the functions to be called up when you printing the Fn (Function) button.
Custom keys setting
Assigning functions to the various keys allows you lot to speed up operations by pressing the appropriate cardinal when the shooting data screen is displayed.
MENU – Custom Settings – folio three
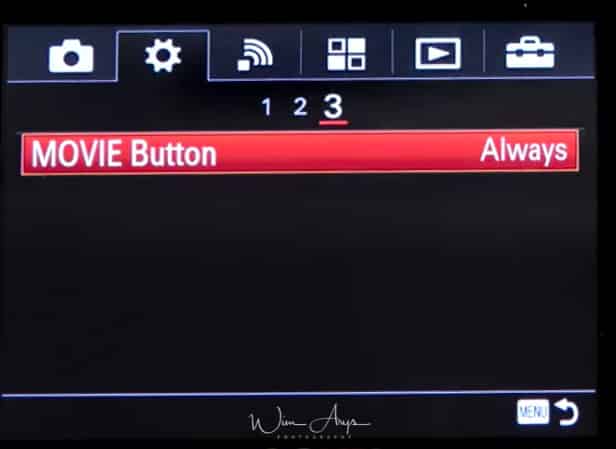
Movie button
Sets whether or not to actuate the MOVIE button.
- Always (default setting): Starts flick recording when you lot press the Film button in any mode.
- Movie Manner Only: Starts movie recording when y'all press the MOVIE button simply if the shooting fashion is set to Movie mode.
MENU – Wireless functionality – page 1
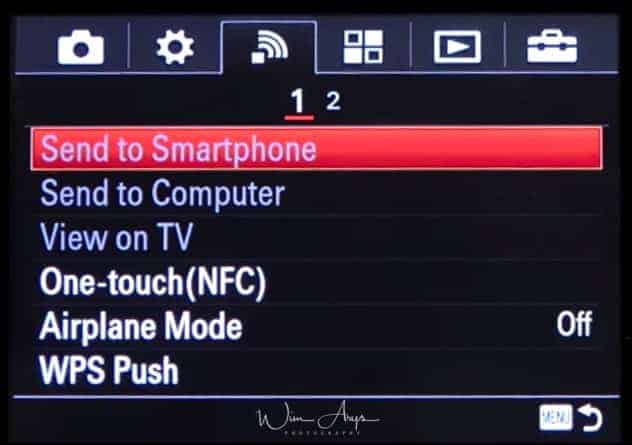
Ship To Smartphone
- Yous can ship one or several images directly to your wireless device (phone or tablet) by pressing this push.
- Yous can either make up one's mind to cull which images you want to transfer on the camera or on the wireless device (via the Sony PlayMemories app, bachelor for gratuitous in the apple or android shop).
- Yous'll accept to connect the camera via Wifi first (information technology makes a Wifi access point), using the instruction on the Sony DSC-HX400V screen.
- It works just similar connecting to any other admission bespeak with your phone or tablet.
- You should do this as apace as possible, but to get it out of the fashion.
- When your phone has wirelessly connected to the camera once, and you've entered the password, it will remember this, and make information technology a lot faster to connect later.
Transport to Computer
You'll need to physically connect the calculator to the camera using the supplied USB cable, and you tin can push selected pictures to your Sony PlayMemories desktop software (installed from the CD or downloaded from their website). This tin even be prepare to go on pushing images afterward the camera has turned off.
View On TV
If you have a Wifi-enabled Tv set, you lot tin view images and slideshows direct from your camera through your home wireless network.
One Impact NFC
Enables Quick, one-bear upon connectedness (as opposed to first accessing the camera's wireless network and and then navigating to the Playmemories app) with NFC (most-field advice) capable devices.
I have not tried this (as my iPhone does not have NFC) but information technology looks a lot easier to use.
Airplane Fashion
Disables all wireless functionality, just like plane fashion does on your phone.
WPS Push
If your access bespeak has the WPS button, yous can annals the access point to the camera easily by pushing the WPS push button.
MENU – Wireless functionality – page ii
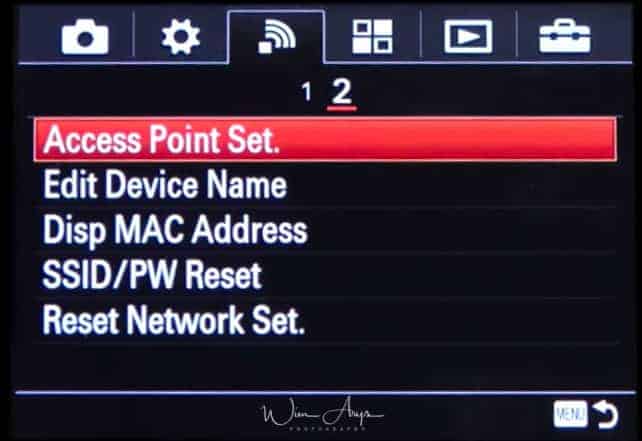
Access Betoken Set
Here you lot can setup an admission point for your camera to the internet.
It enables the Sony DSC-HX400V to install PlayMemories apps from the internet directly. Works simply like setting an access signal (WiFi connection) on your phone.
Edit Device name
If you wish, you tin change the name of the Device Access bespeak perchance to make it easier to identify which A6000 is yours in certain situations.
Disp MAC. address
Displays the MAC address of your Sony DSC-HX400V.
SSID/Pw reset
The Sony DSC-HX400V shares the connexion information for Send to Smartphone and Smart Remote Embedded with a device that has permission to connect. If yous want to change the device that is permitted to connect, reset the connection information.
Reset Network fix
Resets all the network settings to default settings.
Carte – Playmemories settings- page ane
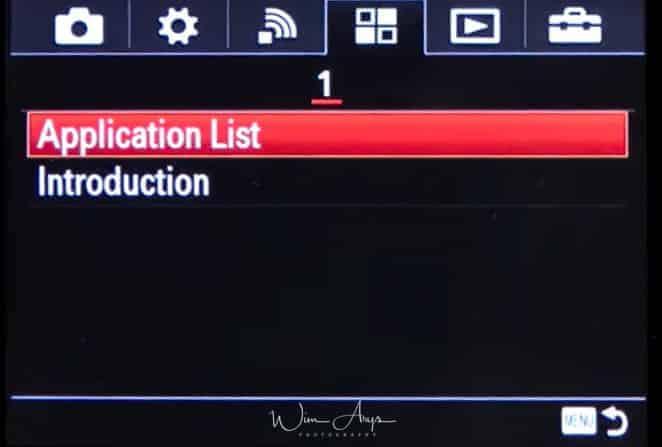
Awarding List
You'll notice The Smart remote control camera app (wich allows y'all to use your phone as a remote control via PlayMemories phone app for iPhone and Android) and the Playmemories Camera app here.
You tin can admission your online PlayMemories business relationship here, or create an account (in one case you've gear up your photographic camera connection with your Wifi network).
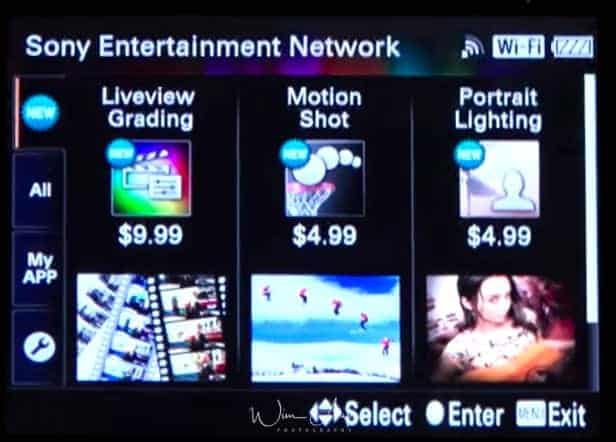
You'll also exist able to download new apps bachelor for purchase in the Sony Playmemories online app store like the Time-lapse and smooth reflection app.
If you lot do not desire to connect your camera to the internet, y'all can always install new apps (and updates) if you connect the camera to your Mac or PC with the supplied USB cablevision, using the Sony PlayMemories desktop application.
Introduction
You'll find information about the service and bachelor countries and regions here.
MENU – playback options – page 1
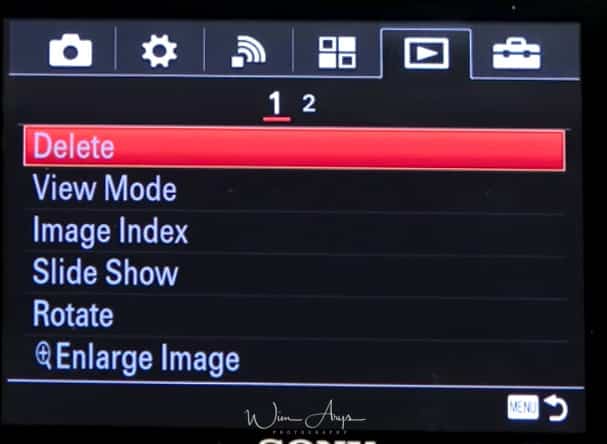
Delete
Delete on or multiple images stored on your SD card.
View Mode
select how the photographic camera will suit captured images in the viewing browser.
Image Index
Select whether you want the image browser to display 12 (larger) or xxx (smaller) images per page.

Slide Show
Select whether you want the camera to repeat slideshows when all pictures are viewed or not, and choose the interval between slides.
Rotate
Change the orientation of images in-photographic camera.
Enlarge Paradigm
Select an image and enlarge a portion of that image. Useful for checking details and focus.
MENU – playback options – folio 2
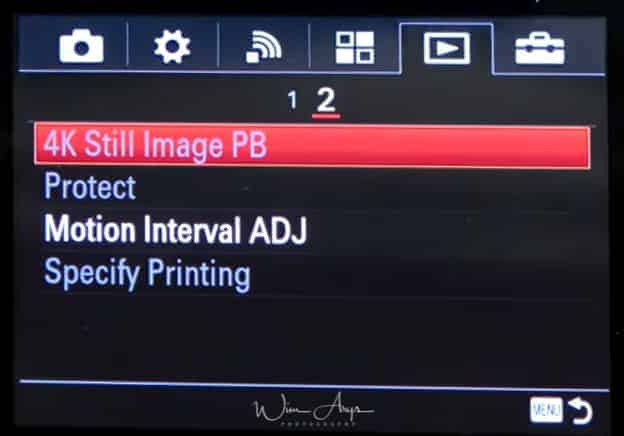
4K Still Image PB
Outputs still images in 4K resolution to an HDMI-connected TV that supports 4K.
Protect
Protect images (selectable or per date) from accidentally being erased.
Motion Interval ADJ
Change the interval of the prototype tracking of the subject area'south motion in high-speed, like a stroboscopic paradigm.
Specify Press
Specify Printing is a feature that allows images to be marked for printing later. Registered images are displayed with the DPOF mark. (DPOF stands for Digital Print Order Format)
Menu – Setup – page 1
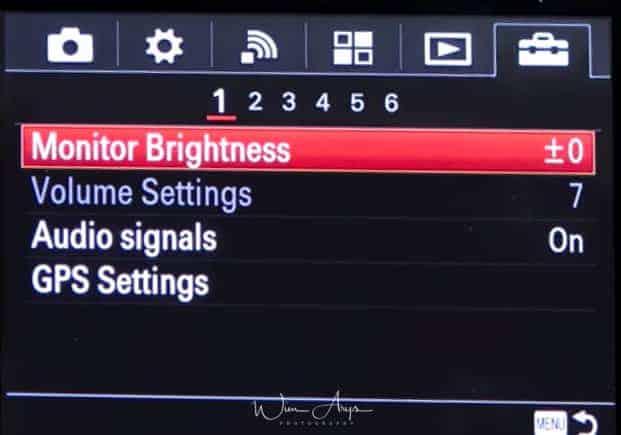
Monitor Brightness
Manually set the Monitor effulgence (recommended go out to zero) or change to a brighter setting for Sunny Weather.
Volume settings
Change the playback volume for recorded video or demos.
Sound Signals
You can plough off audio signals like the beep when te camera achieves focus. Useful if you want a more stealthy operation (although you lot'll yet hear the second mantle shutter).
GPS signals
You tin can record the location information with the images when the built-in GPS sensor of this product can acquire the location information. Using the software PlayMemories Home, you tin can import the images recorded with the location information to a computer and enjoy viewing them on a map which shows their shooting location. Refer to the Help of PlayMemories Home for details.
- On: The GPS function is activated.
- Off: The GPS function is turned off. The status icon on the screen may differ depending on the conditions of the signals emitted from the satellites.
- No icon is displayed: GPS is fix to Off or an fault has occurred.
MENU – Setup – page 2
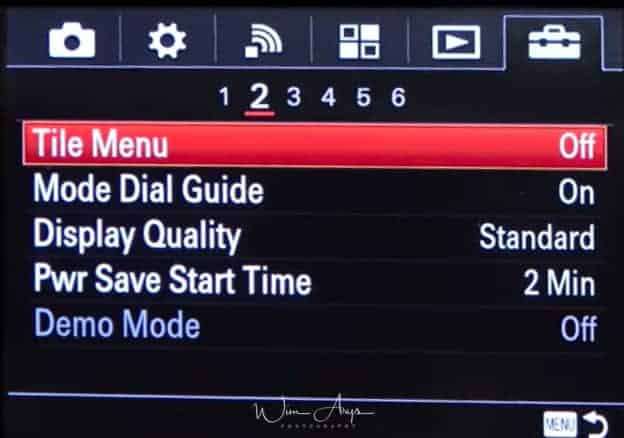
Title Bill of fare
choose between tiles or a tiled forepart page when accessing the MENU or a direct tab style menu layout.
Mode Punch Guide
You tin can display the clarification of a shooting way when yous plough the mode dial and change the settings available for that shooting style. Handy when you are learning how to apply the Sony DSC-HX400V.
Delete confirm
You tin set whether Delete or Cancel is selected as the default setting on the delete confirmation screen.
Display Quality
You lot can change the display quality. Set to standard to preserve battery life.
- Loftier: Displays in loftier quality.
- Standard: Displays in standard quality.
Pwr Save Beginning time
Selects the fourth dimension it takes for the photographic camera to go into slumber mode if you don't employ it.
Demo Mode
Demo mode is only used in retail stores for demonstration purposes.
Carte du jour – Setup – page 3
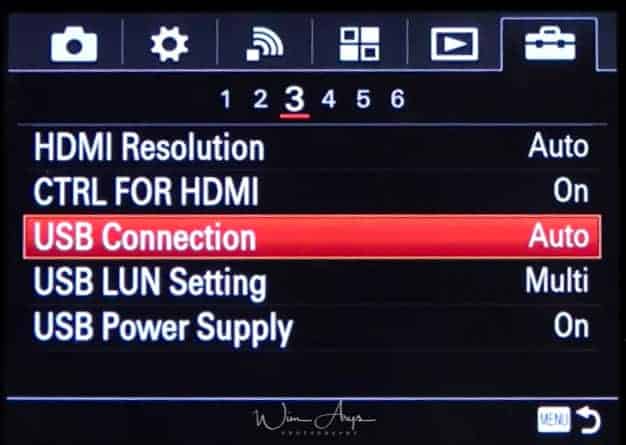
HDMI Resolution
When y'all connect the production to a High Definition (Hard disk) Television with HDMI terminals using an HDMI cable (sold separately), you lot can select HDMI Resolution to output images to the Goggle box.
- Auto (default setting): The product automatically recognizes an Hard disk drive TV and sets the output resolution.
- 1080p: Outputs signals in Hd motion picture quality (1080p).
- 1080i: Outputs signals in HD picture quality (1080i).CTRL for HDMI.
CTRL for HDMI
When connecting this product to a BRAVIA compatible TV using an HDMI cable, you lot can operate this product past aiming the TV remote control at the TV.
Either ON or OFF.
USB connection
Selects what will happen when you connect your camera to your PC or MAC.
- Machine (default setting): Establishes a Mass Storage or MTP connectedness automatically, depending on the computer or other USB devices to exist connected. Windows 7 or Windows 8 computers are continued in MTP, and their unique functions are enabled for utilise.
- Mass Storage: Establishes a Mass Storage connectedness betwixt this production, a estimator, and other USB devices.
- MTP: Establishes an MTP connection between this product, a calculator, and other USB devices. Windows 7 or Windows 8 computers are connected in MTP, and their unique functions are enabled for use.
USB LUN Setting
Improves compatibility with external devices by limiting the functions of the USB connectedness.
Older devices that are not able to connect to the camera might work when set to single. Otherwise, use Multi.
USB ability supply
You can charge theSony DSC-HX400V via USB. This setting sets whether to supply power via the micro USB cable when the production is connected to a computer or an USB device.
MENU – Setup – page 4
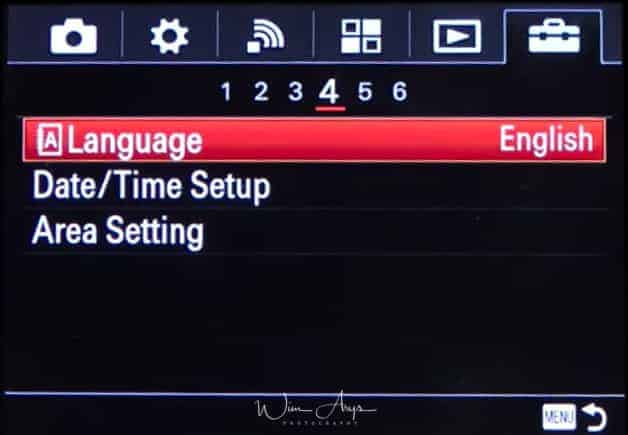
Linguistic communication
Gear up your preferred language. The advantage of setting information technology to Eglish is that you'll notice much more information online when you need any troubleshooting.
Date Time Setup
Change date, time, engagement format and Daylight savings time.
Area setting
Select your region, or change region when away, the camera volition automatically change time and date for you.
Menu – Setup – page five
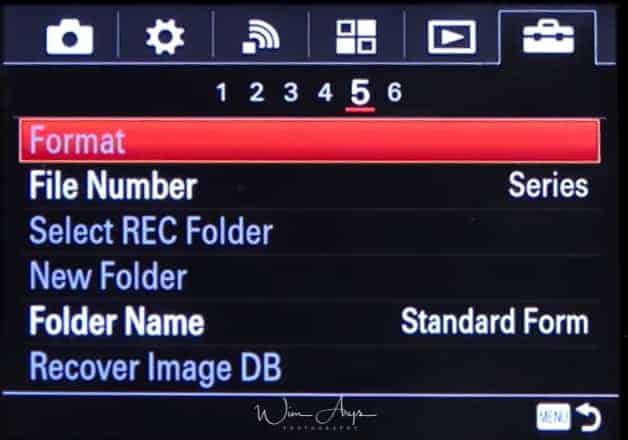
Format
Format your SD menu earlier use; this will erase whatsoever images still on the memory bill of fare.
File Number
Number your files according to a number of shots or reset information technology to offset from 1.
Select REC folder
Selects where the camera volition store newly captured images.
New Folder
Brand a new folder for easily organizing events and locations
Binder name
Choose whether to have folder names in standard class (DSC) or create a new one by appointment. Setting folders by date will make organizing your images easier.
Recover Paradigm DB
If y'all take a storage carte mistake, y'all can attempt to rebuild the database to possibly remember lost images.
MENU – Setup – folio 6
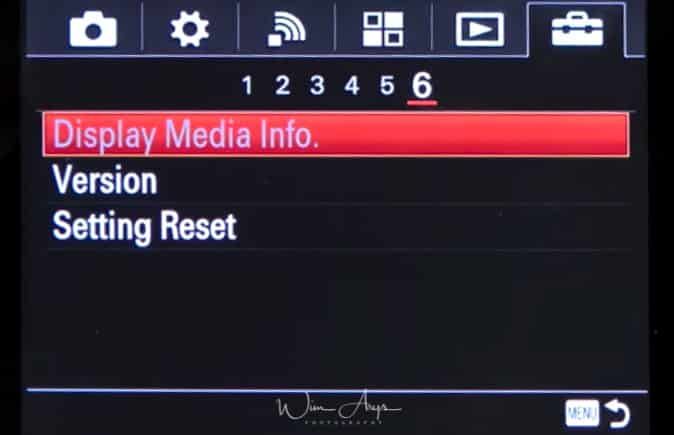
Display media info
Displays the recordable time of movies and the number of recordable however images for the inserted memory carte.
Version
Check what version of the operating organization your photographic camera and lens are running. Sony sporadically releases updates with new features, and then it might exist worth checking if any new firmware versions are available.
Setting Reset
Fully resets the photographic camera to factory settings.
In the adjacent chapter, I'll become over all the functionality that I observe most useful
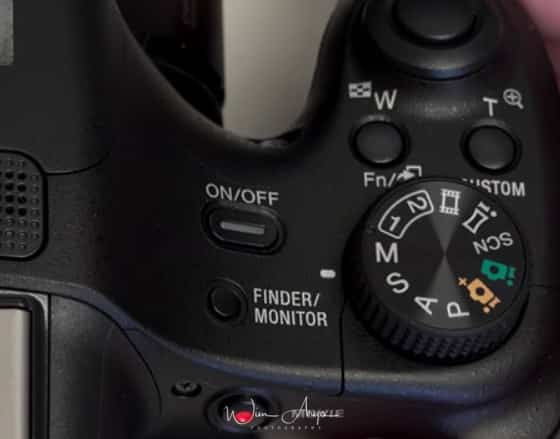
Mode punch functions: what's the deviation between intelligent and superior auto?
Intelligent Machine
- This mode lets the camera detect what kind of scene y'all are photographing. It switches to the scene setting it finds almost appropriate, including aperture, shutter speed, ISO, and AF mode.
- These dissimilar scene settings are the same you'll find manually selectable in SCN mode.
- All Sony cameras do a adept job at detecting scenes, although the avant-garde lensman will adopt to shoot in Aperture, Shutter priority or fully manual fashion in guild to have more than control over things like depth-of-field, motility, and focusing surface area.
Superior Machine
- Does the same scene recognition and (when the photographic camera decides it is appropriate) adds hand-held twilight, anti-motion blur, and backlight correction HDR in society to optimize dynamic range, motion and exposure.
- It uses multiple images shot in close succession at loftier quality and combines them into one jpeg. Works well on stills but should non be used for movement.
Peaking
Peaking enhances the outline of in-focus ranges using a specific color in Manual Focus or Directly Manual Focus shooting.
- This works in MF and DMF focusing modes
- Menu → (Custom Settings) → [Peaking Level] → desired setting.
- Information technology displays a color selectable noise in the regions where the focus is on.
- A depression setting is recommended in enough low-cal on the Sony DSC-HX400V.
- In dim light, you lot might need to go to medium to get a expert idea of where the focus is at.
Lock-on AF
Depending on the options selected in [Focus Area] or [Centre Lock-on AF], the bachelor functions varies when pressing the key. Found in the Focus Area setting. When you press the key when the [Focus Area] is set to [Wide] or [Center] and [Center Lock-on AF] is [On], [Center Lock-on AF] will activate. The camera will automatically focus while pressing the fundamental when the [Focus Expanse] is [Wide] or [Heart], [Focus Mode] is set up to other than [Transmission Focus], and [Center Lock on AF] is set to [Off].
- When you press the center push, the photographic camera detects the subject positioned in the center of the screen and continues to track the subject.
- Card → (Camera Settings) → [Lock-on AF] → [On]
- Align the target frame (A) over the subject and press in the centre of the control bicycle. Printing again to stop tracking.
- If the camera loses track of the subject, it tin find when the subject reappears on the monitor and resume tracking.
- Press the shutter push fully down to shoot the image.
Smile/face detect
When set to On, The Sony DSC-HX400V will automatically find and focus on faces. This is a very powerful characteristic.
Go to Bill of fare → (Camera Settings) → [Grinning/Face up Find.] and select either:
- On : Automatically selects a face to be brought into focus.
- Grinning shutter: Automatically detects and shoots a grin. When the Smile/Face Find. is set to Smile Shutter, you can select the Smile Detection Sensitivity from Slight Grinning, Normal Smile or Big Smiling.
Determination
Although the Sony DSC-HX400V compact camera is accounted an enthusiast oriented or 'beginner' camera, you'll find that it has many of the advanced features of the Sony RX and even ILC line. An advanced manual similar this can help yous make the well-nigh of information technology, and brand you a better lensman. If y'all're just starting out in photography, I would propose taking a expect at the SCN or Scene selections that give yous a good starting point for any type of activity or subject y'all'd similar to shoot.
At that place are many subconscious features and functions similar this inside the Sony HQ400V, and I would suggest taking some time to larn some of them. I know that and advanced guide like this looks daunting at first, but y'all'll soon get the hang of information technology by easily following along with your camera's bill of fare organization.
Source: https://www.wimarys.com/sony-dsc-hx400v-advanced-manual-with-tips-and-tricks/
0 Response to "Sony Dsch400 Power on and Off Again Error"
Post a Comment